This is the multi-page printable view of this section. Click here to print.
Guides
1 - Quick Start
Contents
How to Register with Remember Me (Free)
How to Modify Account Settings
How to Quickly Add a Verse to Remember Me
How to Open a Verse Card
How to Edit a Verse
How to Delete a Verse
How to Add a Label to a Verse
How to Sort Verses in a Section
How to Filter Verses
How to Move Verses between Sections
How to Play Verses
How to Open Study Mode
How to Import Collections
How to Publish Your Verse Collection
How to Export Verses
How to Change the Text Size
How to Sync between Devices
How to Add Accounts
How to Switch between Accounts
Bible Book Abbreviations
Notes:
- Remember Me is still in development, so what you see on your device may differ slightly from the images in this user guide.
- To show tooltips on the app,
- Long-press the icon (Android/iPhone app)
- Hover over the icon (Web version)
- When something is not working as supposed to be, try the following:
- For Android/iPhone app: Restart the app or restart the phone
- For the Web version: Refresh the browser, clear the browser cache, or remove the Remember Me’s cookie (remem.me) and log back in
How to Register with Remember Me (Free)
To register as a Remember Me user:
Go to web.remem.me.
Tap (or click) GET STARTED. (Swipe up if you don’t see the button.)

Enter your email address and password. Tap REGISTER at the bottom.
Tap (or click) the link on the activation email you’ll receive.
Tap LOG IN at the upper right.

- If you are not using an Android or iPhone app, tap at the top left on the “Registration Completed” page or access web.remem.me, where you’ll see LOG IN at the top.

- Enter your email address and password, and tap LOG IN at the bottom.
See “Register and Log In a User” for more information.
[Back to Top]
How to Modify Account Settings
Tap to show the main navigation bar on the left (if not shown already).

Select Account with your account name (usually the left part of @ of your email address).

Select a language of verses and references, and other settings as needed.

If you turn on Include Reference in Learning, the Book name, the chapter and verse number(s) appear under the verse text on the flashcard.

Tap on the upper left to save the account settings.

See “Users and Accounts” for more information. [Back to Top]
How to Quickly Add a Verse to Remember Me
You can copy any verses from the Bible websites to Remember Me with a few taps.
Tap to show the main navigation bar on the left (if not shown already).

Tap My Verses.

In the NEW section, tap at the bottom.


Tap on the Source box and select a Bible version from the dropdown list. Instead, you can type a three-letter Bible abbreviation in all capitals (e.g., ESV).


- If you want to select Bibles in other languages, we suggest you create separate accounts for each language. (See “How to Add Accounts”)
Type a Book name in the Reference box at the top. Once the name is recognized, the complete Book name (e.g., “Genesis”) appears below the Reference box. Tap (or press the Enter key) the Book name. Usually, the Book name is recognized after you start typing the first few words. (Refer to “Bible Book Abbreviations”)

Enter a chapter number, followed by a colon and verse number(s) (e.g., Genesis 1:1-3).

As soon as you enter a chapter number, the orange Bible button appears at the top right. Tap the orange Bible button.

If you want to include the verse number(s), slide the toggle button to the right.

You’ll be directed to a Bible website with the chapter/verses of the Bible version you selected. Tap the red paste button at the bottom right to copy the text.

The verse has now been copied to the Passage section on the app. Edit the text as needed.

You can add a topic name if you like.

You can also add an image to each of your verse cards. If you tap the image icon on the right in the Image URL box, you can insert a photo image from Unsplash.com. Enter a keyword of images you want in the search box. Tap an image you want to insert.


The URL of the Unsplash image is inserted in the Image URL box. Instead, you can type any other image URL of your choice.

Tap at the top left to save the verse card.

The verse has now been added to the NEW section.

See “Managing Bible Memory Verses” for more information. [Back to Top]
How to Open a Verse Card
To open the flashcard’s front side, tap the verse’s right part (not the badge). If you want to open the back side of the card directly, long-press this part.

The reference (Book name and chapter/verse numbers) side of the card opens in the case of the NEW section. The topic and label names may also show depending on the settings.

To flip the card, tap the card (or tap at the bottom right). The verse side appears (in the case of the NEW section). Tap the card again to flip the card.

How to Edit a Verse
Tap (Show menu) at the top right corner of either side of the flashcard. Select Edit.

See “How to Quickly Add a Verse on Remember Me” for how to edit a verse.
[Back to Top]
How to Delete a Verse
Tap the badge of the verse in the list view to select a verse.

The badge changes to a checkmark when selected. If you want to select all verses in the section, tap (Select all). To deselect, tap the badge again. Tap (Show Menu) at the top right corner.

Tap Delete. (Each section has a different menu, but Delete is available in all sections.)

How to Add a Label to a Verse
A level allows you to group verses and share them in public as your verse collection.
Tap the badge of a verse to select a verse. Tap (Add/remove labels).

Alternatively, while either side of the flashcard is open, tap (Show menu) at the top right. Select Labels.

To choose an existing label, select the checkbox.

To create a new label, tap
 (Add a label).
Type a label name. Tap at the bottom to save the label.

Select the checkbox and tap to save.

The label name is shown at the bottom right of the verse and the bottom of the card.


See “Grouping and Filtering by Labels” for more information. [Back to Top]
How to Sort Verses in a Section
- Tap the current section tab. To find out which section you are in now, look for the triangle button
 and an orange underline on the section tab.
- Sort verses in the section by your desired order.

[Back to Top]
How to Filter Verses
Tap (Show/hide labels) on the upper right.

Filtering options appear. Under this standard menu, the labels you created will also be listed so you can filter by label.

When Boxes is On, the verses are shown in separate sections (New, Due, and Known).


When Boxes is Off, all the verses are shown together in one section.


See “Filter Verses by Label” for more information. [Back to Top]
How to Move Verses between Sections
Swipe the verse to move it to the section to the right while the verse side of the card is open.
If you want to undo the action right after that, tap to undo the action.

You can also display options to move the verse(s) between sections from (Show Menu) while the card(s) is selected in the list view.
- To move a verse from the DUE section:
In the DUE section, tap the badge of the verse to select it. (Tap again to deselect it.)

Tap at the top right corner.

To move the verse(s) back to NEW, tap Move to ‘New.’ To move the verse(s) to KNOWN, tap Remembered.

- To move a verse from the KNOWN section:
In the KNOWN section, tap the badge of the verse to select it. (Tap again to deselect it.)

Tap at the top right corner.

You can move the verse(s) back to the ’NEW’ or ’DUE’ section.

How to Play Verses
To play a verse, tap at the bottom of the list view or at the upper right on the verse side of an individual card.

Control buttons such as and appear while playing.


Tap to adjust speech settings.


See “Audio Features” for more information. [Back to Top]
How to Open Study Mode
Tap at the bottom left of the flashcard.
Select a study game you want to play.


Tap to adjust study settings.

See “Studying and Reviewing Scripture Memory Verses” for more information.
[Back to Top]
How to Import Collections
You can import verses published by others, and you can publish your verses.
Tap Collections on the main navigation bar on the left.

The listing of collections published by other users appears.

Tap to search for your desired theme. You can also sort the collections. Tap “Relevance” (default sort setting) to view sort options.

Tap a collection to view the details. Tap to import the collection to My Verses in your current account.
See “Importing and Sharing Bible Verse Collections” for more information.
[Back to Top]
How to Publish Your Verse Collection
To publish your verses as a collection, you need first to add labels to your verses to group verses. (See “How to Add a Label to a Verse”)
Tap at the top.

Your label names (if any) appear as your collections. Tap a collection you want to publish.

Enter the description. The minimum length is 10 characters. Tap at the bottom right to publish.

The icon in My Collections changes to after publishing. Tap if you want to share your collection with someone individually.

To unpublish, open the collection and tap at the bottom.
See “Publish a Collection of Bible Scriptures” for more information. [Back to Top]
How to Export Verses
You can export and import verses stored in Remember Me in CVS format.
Tap at the top right corner.

If you want to export all verses in all sections, Turn the Boxes off and select All verses.

Tap file_open on the upper right corner. (This menu is available on mobile apps only)
.png)
To export, tap Export to file.

Select an app or a drive to export as a CVS file.
- To import verses, tap Import from file. The file must be a CVS file in the same format and stored in a local folder. (For Android, store the importing file in a local folder other than the Download folder.) [Back to Top]
How to Change the Text Size
Tap Settings on the main navigation bar. (If the navigation bar is not shown, tap on the upper left.)

Tap General Settings.

Adjust the text size in .

How to Sync between Devices
Tap to open the main navigation bar (if not open yet).

Tap (or a similar icon) at the top of the main navigation bar. (Available on mobile apps only)

See “Synchronising Multiple Devices” for more information. [Back to Top]
How to Add Accounts
A user can have one or more accounts for different purposes.
Tap to show the main navigation bar on the left (if not shown already).

Tap at the upper right.

Note that the triangle is changed to in the account navigation bar.

Tap Create New Account.

Enter an account name.

Select a language of verses and references, and other settings as needed.
Tap on the upper left to save the account settings.

See “Multiple Verse Accounts” for more information. [Back to Top]
How to Switch between Accounts
Tap on top right of the main navigation bar.

Tap one of your accounts in the account navigation bar.

Tap to return to the main navigation bar (if necessary).

[Back to Top]
Bible Book Abbreviations

2 - How to Memorise Greek and Hebrew Bible Verses
Whether you’re a seminary student, pastor, or devoted Scripture enthusiast, memorising Bible verses in their original Greek and Hebrew opens a deeper connection to the text. In this guide, I’ll show you how to use spaced repetition and study games to commit original language verses to long-term memory.
Remember Me is a Bible memorisation app that fully supports original language memorisation with keyboard input, text-to-speech pronunciation, and interactive study games. Everything in this guide works on iOS, Android, and web.
Why Memorise in Original Languages?
Memorising Bible verses in Greek and Hebrew offers unique benefits:
- Direct access to the original inspired text without translation interpretation
- Deeper understanding of nuanced meanings, word plays, and literary structures
- Enhanced language learning that reinforces vocabulary and grammar
- Richer meditation on familiar passages in their original form
- Better sermon preparation with instant recall of key texts
Getting Started
Step 1: Create a Dedicated Account
I recommend creating a separate verse account for original language study. This keeps your Greek or Hebrew verses on their own review schedule, separate from any English memorisation.
When creating your account, configure these key settings:
- Language of the references: Set to English (or your native language). This lets you type familiar references like “John 3:16” rather than “Ἰωάννης 3:16”, and TTS will announce verse locations in English.
- Language of the verses: Set to Hebrew or Greek, matching the passages you’ll memorise.
This combination means you get English book names for easy navigation, while the actual verse text comes from your chosen Greek or Hebrew source.
Step 2: Enable Your Keyboard
Before adding Greek or Hebrew verses, enable the appropriate keyboard on your device:
iOS:
- Go to Settings → General → Keyboard → Keyboards
- Tap “Add New Keyboard”
- Select “Greek” or “Hebrew”
Android:
- Go to Settings → System → Languages & Input → Virtual Keyboard
- Select your keyboard app (Gboard, Samsung Keyboard, etc.)
- Add Greek or Hebrew language
Desktop:
- macOS: System Preferences → Keyboard → Input Sources → Add Greek/Hebrew
- Windows: Settings → Time & Language → Language → Add a language
Step 3: Add Verses from Original Language Sources
- Open Remember Me and tap Add Verse
- In the Reference field, type the verse location (e.g., “Genesis 1:1”). Because you set your reference language to English in Step 1, autocomplete will suggest familiar book names.
- Tap the Source dropdown and select your Greek or Hebrew text edition.

- Once both Reference and Source are filled, a floating action button (book icon) appears in the bottom corner.
- Tap it to open the online Bible. The app displays the verse from the source you selected.
- Verify the correct passage is shown, then tap the paste button to insert the text into your verse.
- Tap Save.
The app handles right-to-left Hebrew text automatically.

Step 4: Practice with Study Games
All of Remember Me’s study games work with Greek and Hebrew text:
- Flashcards: Review verses with spaced repetition scheduling
- Typing: Practice writing verses using your Greek or Hebrew keyboard
- Puzzle: Arrange word tiles in correct order (great for learning word order)
- Obfuscate: Reveal hidden letters progressively
- Line-Up: Put verses in sequence
Step 5: Use Text-to-Speech for Pronunciation
Remember Me’s text-to-speech feature works with Greek and Hebrew, helping you:
- Learn correct pronunciation as you memorise
- Practice listening comprehension
- Reinforce auditory memory alongside visual
Enable TTS in Settings and tap the speaker icon while reviewing verses.
Study Tips for Original Languages
Start with Familiar Passages
Begin with verses you already know well in English. Your familiarity with the meaning lets you focus on the original words:
Greek starters:
- John 1:1 — Ἐν ἀρχῇ ἦν ὁ λόγος
- John 3:16 — Οὕτως γὰρ ἠγάπησεν ὁ θεὸς τὸν κόσμον
- Romans 8:28 — Οἴδαμεν δὲ ὅτι τοῖς ἀγαπῶσιν τὸν θεὸν πάντα συνεργεῖ
Hebrew starters:
- Genesis 1:1 — בְּרֵאשִׁית בָּרָא אֱלֹהִים
- Psalm 23:1 — יְהוָה רֹעִי לֹא אֶחְסָר
- Isaiah 40:31 — וְקוֹיֵ יְהוָה יַחֲלִיפוּ כֹחַ
Focus on Small Portions
Original language memorisation takes more effort than English. Start with:
- Single verses rather than paragraphs
- Key phrases within longer verses
- Building up gradually as fluency increases
Remember Me’s spaced repetition algorithm handles scheduling automatically. Trust the system—review when prompted, and the verses will move into long-term memory.
Use Typing Games Strategically
The typing game reinforces letter recognition and keyboard fluency. Even if typing feels slow at first, the muscle memory you build accelerates future memorisation.

Create Dedicated Study Sessions
Consider setting specific times for original language review, separate from your English memorisation. This focused approach prevents mental fatigue from constant script-switching.
Pair with Grammar Study
Memorisation reinforces language learning. As you memorise, note:
- Verb forms and conjugations
- Case endings in Greek nouns
- Hebrew verb stems (binyanim)
- Vocabulary in context
Troubleshooting
Text displays incorrectly: Ensure your device has fonts installed for Greek/Hebrew. Most modern devices include these by default.
Keyboard won’t switch: Check that you’ve added the language keyboard in system settings, not just the app.
TTS sounds robotic: See configuring voice settings for tips on selecting better Greek or Hebrew voices.
Beyond Bible Verses: Greek and Hebrew Vocabulary
Remember Me isn’t limited to Bible verses—you can use it to memorise Greek and Hebrew vocabulary too.
For vocabulary study, create a dedicated account with these settings:
- Language of the references: Greek or Hebrew (the original word)
- Language of the verses: English (the definition)
This is the reverse of Bible verse accounts, because now the Reference field holds the Greek/Hebrew word and the Passage field holds the English meaning.
Adding Vocabulary Manually
Create vocabulary cards by entering words directly:
- Reference: The Greek or Hebrew word (e.g., “ἀγάπη” or “אָהַב”)
- Passage: The definition or translation
- Source: Your textbook name or “Vocabulary”
Importing Vocabulary Lists
For larger vocabulary sets, prepare a CSV file and import it:
- Create a CSV with columns: Reference, Passage, Source, Topic
- Use Reference for the word, Passage for the definition
- Go to Labels → tap the file icon (top-right) → Import
- Select your CSV file
Sharing Your Collections with Fellow Students
If you’re a teacher or study group leader, you can publish your Greek or Hebrew vocabulary collections on Remember Me for others to use. This is a great way to share curated word lists with your class or study group.
To share a collection:
- Organize your verses or vocabulary into a labeled collection
- Publish the collection through your Remember Me account
- Share the collection link with your students or fellow learners
Students who subscribe to your collection will automatically receive updates when you add new words or verses—perfect for building a shared vocabulary list throughout a semester.
Browse and share collections at web.remem.me/collections.
Memorising Scripture in the original languages is a rewarding discipline that deepens both your biblical knowledge and language skills. With Remember Me’s full support for Greek and Hebrew, you have all the tools you need to hide God’s Word in your heart—in the very words it was first written.
3 - Prayers & Devotions
Create a Prayer Account
Create a separate account for texts that you want to read regularly rather than memorise. Since the references probably play a minor role, you can select the option “Learn by Topic” when setting up the account.
Adding Prayers/Devotions
You can add texts in the “New” box or import a collection of texts from “Collections”. Some kind of numbering is useful as reference. For example, if you split up a collection of long prayers into individual prayer cards - such as the books by Stormie Omartian - the references could be 1a, 1b, 1c, 2a, 2b etc. References are used to sort the cards. It is also helpful to add a topic to each prayer.
Pray Daily
Sort the prayers by topic or by reference (alphabetically) by tapping the “New” tab a second time. It is best to say the prayers aloud and in your own dialect or words. This way, even preconceived prayers can turn into a personal conversation with God. Write down impressions and thoughts that become important to you during prayer below the prayer text (see Editing a verse). In this way, your prayer account also becomes your prayer diary and reflects part of your communication with God. Move the prayer after your daily devotion to the “Due” box to keep track of your prayer progress. The “Known” tray is not needed for prayers.
Reusing a Prayer Collection
If you want to start over with a prayer collection after you have completed it, select a prayer (tap on its badge on the left), then “select all”, and move the whole collection back to the “New” box.
4 - How to Run a Bible Memory Campaign with Your Church or Small Group
Running a Bible memory campaign brings your church, small group, or family together around God’s Word. Whether you’re leading a youth group through the book of James, guiding your congregation through an Advent series, or challenging your small group to memorize key verses on faith, Remember Me makes it easy to organize, share, and track your progress together.
This guide walks you through setting up a campaign from start to finish using Remember Me’s subscribable collections and group metrics features.
Why Run a Memory Campaign?
Group memorization creates accountability and community that solo efforts often lack:
- Shared commitment keeps everyone motivated when enthusiasm wanes
- Natural discussion emerges as participants wrestle with the same passages
- Collective progress celebrates the group’s growth, not just individual achievement
- Lasting impact as participants carry Scripture with them long after the campaign ends
Remember Me is ideal for campaigns because it’s completely free (no premium tiers or participant limits), works offline, syncs across all devices, and now offers subscribable collections with group progress tracking.
Step 1: Plan Your Campaign
Before creating your collection, think through these key decisions:
Choose Your Verses
Pick verses that serve your group’s spiritual needs:
- Topical collections around themes like faith, hope, love, anxiety, or identity in Christ
- Book studies working through James, Philippians, or a Psalm
- Seasonal series for Advent, Lent, or a summer challenge
- Foundational passages like the Romans Road or key promises
Tip: 15-25 verses is a sweet spot for most campaigns. Enough to be substantial, achievable enough to complete.
Set Duration and Pace
Match your timeline to your group’s capacity:
| Campaign Length | Suggested Pace | Best For |
|---|---|---|
| 4 weeks | 3-5 verses/week | Intensive studies, motivated groups |
| 6-8 weeks | 2-3 verses/week | Small groups, Sunday school classes |
| 12 weeks | 1-2 verses/week | Families, casual pace |
| Ongoing | Self-paced | Open-ended collections |
Define Success
What does “memorized” mean for your group? Remember Me uses a level system where levels increase with each successful review:
- Level 2+ means a verse is memorized (committed to memory)
- Level 4+ indicates the verse is stable/mastered
- Higher levels mean longer intervals between reviews
Consider setting a group goal like “80% of participants reach level 4 on all verses by the end.”
Step 2: Create Your Collection
Create a New Label
- Open Remember Me and go to Labels
- Tap the + button to create a new label
- Keep the label name short (e.g., “Romans Road” or “Faith Verses”) since it appears as a badge on each verse

You’ll add a longer, descriptive name when you publish the collection.
Add Your Verses
Add verses to your label using any of these methods:
Manual entry:
- Tap Add Verse
- Enter the reference and select your Bible translation
- Use the book icon to fetch the passage automatically
- Assign the verse to your campaign label
Import from another Bible app:
- Copy a verse from YouVersion, Olive Tree, Logos, or other apps
- Remember Me automatically parses the reference and passage
Import from CSV:
- Prepare a spreadsheet with Reference, Passage, Source columns
- Import via Labels → File icon → Import
Organize Your Verses
Order matters for campaigns. Arrange verses in the sequence you want participants to learn them:
- Chronological order for book studies
- Thematic groupings for topical collections
- Progressive difficulty (simpler verses first)
Add Topics to verses to help participants see how they connect to your campaign theme.
Step 3: Publish Your Collection
Once your verses are ready, publish your label to make it available for others to subscribe.
How to Publish
- Go to Labels and tap your campaign label
- Tap the label’s badge (the icon on the left side of the label row) to open label settings
- Select Publish Collection
- Write a compelling description explaining:
- What the collection is about
- Who it’s for
- How to use it in the campaign context

Write a Good Description
Your description helps participants understand the collection’s purpose. Remember Me supports rich text formatting—select text and use the context menu to apply bold, italic, underline, block quotes, bullet points, and more.
A well-crafted description can include theological context, explain your organizational structure, and guide participants through the collection’s purpose. See the F.I.S.H. collection for an example of a richly formatted description.
Get Your Share Link
After publishing, you’ll receive a shareable link like:
https://web.remem.me/collections/704152580857592

This link works for anyone—they don’t need an account to view the collection, though they’ll need one to subscribe.
Step 4: Invite Participants
Share Your Collection
Distribute your collection link through:
- Church announcements or bulletins
- Small group messaging (WhatsApp, GroupMe, etc.)
- Email newsletters
- QR codes on printed materials
What Participants See
When someone opens your collection link and taps Subscribe:
- All verses are added to their account with a new label
- They can start memorizing immediately
- Their progress (review dates, levels) is private to them
- The label shows a bookmark badge indicating it’s linked to your collection

Subscribers are linked to your collection and can receive updates when you modify it. Their memorization progress contributes to your campaign metrics.
Step 5: Track Group Progress
Once you have subscribers, Remember Me provides aggregate metrics showing how your group is doing—without exposing individual progress.
The Metrics Dashboard
Open your published collection to see the metrics panel. Metrics appear once you have subscribers actively working on the collection.
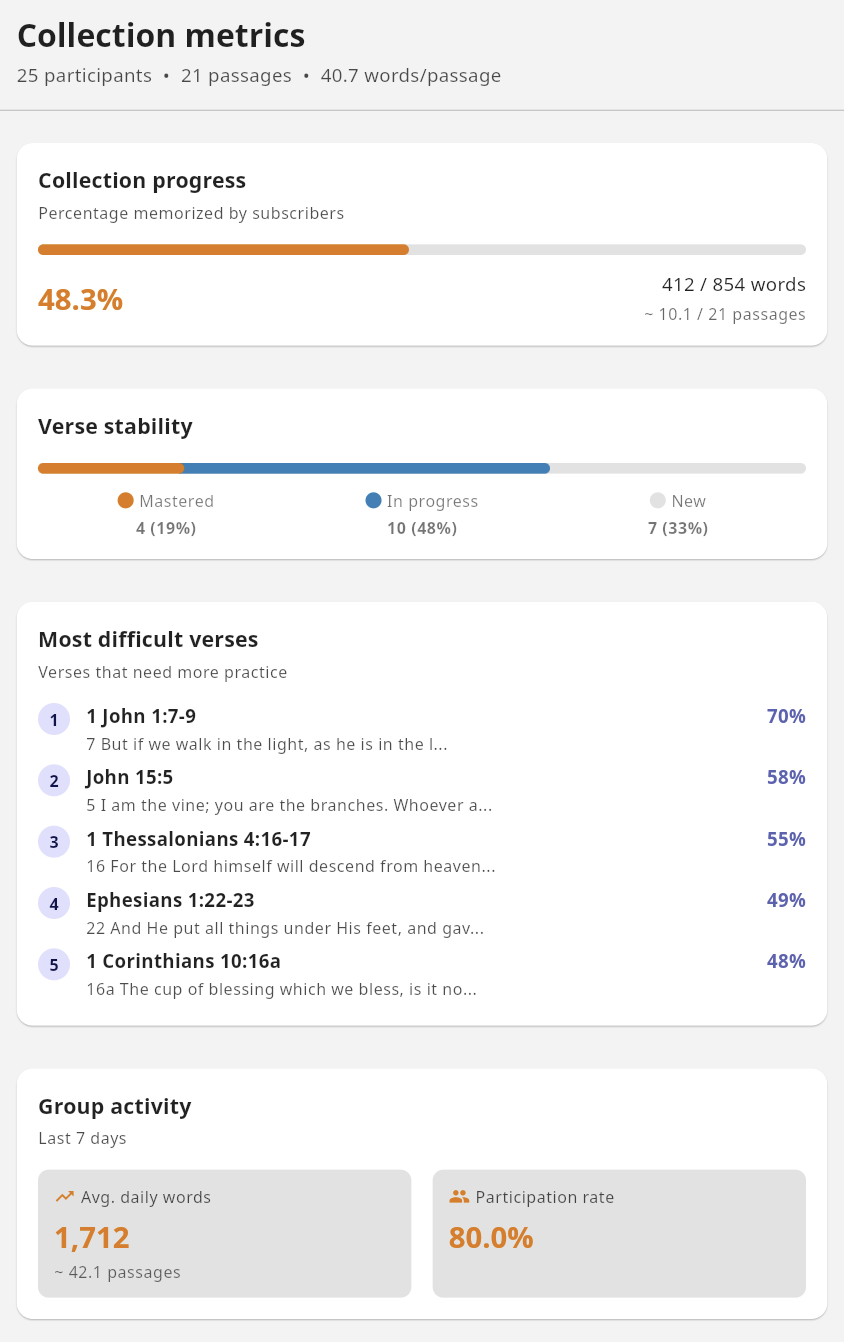
Understanding the Four Metrics
1. Collection Progress
Shows what percentage of the collection has been memorized across all subscribers, calculated by word count and weighted by participation. In the example above: 48.3% complete (412 of 854 words).
2. Verse Stability
Distribution of verses by how well the group has learned them:
- Mastered (orange): 60%+ of participants have this verse at level 4+
- In Progress (blue): 20-59% of participants have reached level 4+
- New (gray): Less than 20% have mastered this verse
In the example: 4 verses mastered (19%), 10 in progress (48%), 7 new (33%).
3. Most Difficult Verses
A ranked list showing which verses the group finds most challenging. The difficulty score combines how many subscribers haven’t yet memorized the verse, how many haven’t mastered it, and how frequently it needs reviewing. Higher percentages mean more subscribers are struggling with that verse.
In the example, 1 John 1:7-9 shows 70%—a good candidate for group discussion or additional teaching.
4. Group Activity
Engagement over the last 7 days:
- Avg. daily words: How many words the group reviews per day (1,712 in the example, about 42.1 passages)
- Participation rate: What percentage of subscribers are actively reviewing (80% in the example)
These metrics help you spot when engagement is dropping so you can encourage your group.
Privacy Note
All metrics are aggregate and anonymous. You cannot see individual participant progress, names, or activity. This protects privacy while still giving you useful campaign insights.
Step 6: Keep Your Collection Fresh
Campaigns evolve. You might need to add verses, fix typos, or update content. Subscribable collections make this easy.
Adding New Verses
Add new verses to your label. Subscribers will see an update notification (a dot on their label’s badge) and can tap to sync. Great for:
- Releasing verses week by week
- Adding bonus content mid-campaign
- Responding to group needs
Fixing Errors
Found a typo or wrong reference? Edit the verse in your collection. When subscribers sync, those who haven’t customized that verse will receive the correction.
How Smart Sync Works
Remember Me automatically detects when you’ve updated your collection and shows subscribers a notification dot on their label. When they tap to sync:
- New verses are added to their collection
- Updated verses receive your changes (if they haven’t edited them)
- Customized verses are preserved—if a participant modified a verse, their version is kept
- Progress is never lost—review history, levels, and commit dates stay intact
This means you can improve your collection without disrupting anyone’s memorization progress.
What If a Subscriber Customizes a Verse?
If a participant edits a verse (changing the passage text, for example), that verse becomes “theirs” and won’t receive future updates from you. This is intentional—it respects their personal study while keeping the option to sync everything else.
Tips for Successful Campaigns
Start Manageable
It’s better to complete a smaller collection than abandon an ambitious one. You can always create follow-up campaigns.
Build in Checkpoints
Schedule regular encouragement moments:
- Week 2: “We’ve started strong!”
- Midpoint: Review difficult verses together
- Final week: Celebration and reflection
Use Metrics Wisely
The difficult verses list is a teaching opportunity. If everyone struggles with Romans 8:28, spend time in your group unpacking its meaning—understanding aids memorization.
Celebrate Together
When your group hits milestones (50% complete, first verse mastered by everyone), celebrate! Recognition fuels motivation.
Keep Communication Open
Create a space (group chat, weekly email) where participants can:
- Share what they’re learning
- Ask questions about verses
- Encourage each other
- Report struggles so you can help
Example: F.I.S.H. My Identity in Christ
For inspiration, explore the F.I.S.H. My Identity in Christ collection—22 verses organized around the ancient Christian fish symbol (Ichthys):
- F (Faith): Verses on redemption of the past through Christ’s sacrifice
- I (Incarnation): Verses on present community and fellowship
- S (Spirituality): Verses on relationship with the Holy Spirit
- H (Hope): Verses on future resurrection and eternal life
This collection demonstrates effective campaign design:
- Clear thematic organization
- Manageable size (22 verses)
- Logical progression building on each section
- Rich description explaining the framework
Campaign Ideas
Need inspiration? Here are some formats to consider:
4-Week Intensive
Topic: Key promises of God Pace: 5 verses per week Best for: Motivated small groups, youth retreats
6-Week Small Group Study
Topic: Book of James (selected verses) Pace: 3-4 verses per week Best for: Regular small group meetings with discussion
Advent/Lent Series
Topic: Prophecy and fulfillment / Passion narrative Pace: 1 verse per day for the season Best for: Church-wide participation, families
Summer Family Challenge
Topic: Psalms of praise Pace: 1-2 verses per week Best for: Multi-generational, relaxed summer schedule
Youth Group Competition
Topic: Armor of God (Ephesians 6) Pace: Team-based, self-paced Best for: Energetic groups who enjoy friendly competition
Running a Bible memory campaign multiplies the impact of Scripture memorization. When your group commits to learning God’s Word together, you build community while hiding truth in hearts that will carry it for a lifetime.
Ready to start? Create your collection and invite your group to join you.